
![]()
MNIST 教程#
欢迎来到 Flax NNX!在本教程中,您将学习如何使用 Flax NNX API 构建和训练一个简单的卷积神经网络 (CNN),以对 MNIST 数据集中的手写数字进行分类。
Flax NNX 是一个基于 JAX 构建的 Python 神经网络库。如果您之前使用过 Flax Linen API,请查阅为什么选择 Flax NNX。您应该对深度学习的主要概念有一定的了解。
让我们开始吧!
1. 安装 Flax#
如果您的 Python 环境中尚未安装 flax,请使用 pip 从 PyPI 安装该软件包(如果您在 Google Colab/Jupyter Notebook 中工作,只需取消下方单元格中的代码注释即可)
# !pip install flax
2. 加载 MNIST 数据集#
首先,您需要加载 MNIST 数据集,然后通过 Tensorflow Datasets (TFDS) 准备训练集和测试集。您需要对图像值进行归一化、对数据进行洗牌并将其划分为批次,并预取样本以提高性能。
import tensorflow_datasets as tfds  # TFDS to download MNIST.
import tensorflow as tf  # TensorFlow / `tf.data` operations.

tf.random.set_seed(0)  # Set the random seed for reproducibility.

train_steps = 1200
eval_every = 200
batch_size = 32

train_ds: tf.data.Dataset = tfds.load('mnist', split='train')
test_ds: tf.data.Dataset = tfds.load('mnist', split='test')

train_ds = train_ds.map(
  lambda sample: {
    'image': tf.cast(sample['image'], tf.float32) / 255,
    'label': sample['label'],
  }
)  # normalize train set
test_ds = test_ds.map(
  lambda sample: {
    'image': tf.cast(sample['image'], tf.float32) / 255,
    'label': sample['label'],
  }
)  # Normalize the test set.

# Create a shuffled dataset by allocating a buffer size of 1024 to randomly draw elements from.
train_ds = train_ds.repeat().shuffle(1024)
# Group into batches of `batch_size` and skip incomplete batches, prefetch the next sample to improve latency.
train_ds = train_ds.batch(batch_size, drop_remainder=True).take(train_steps).prefetch(1)
# Group into batches of `batch_size` and skip incomplete batches, prefetch the next sample to improve latency.
test_ds = test_ds.batch(batch_size, drop_remainder=True).prefetch(1)
---------------------------------------------------------------------------
AttributeError                            Traceback (most recent call last)
AttributeError: 'MessageFactory' object has no attribute 'GetPrototype'
---------------------------------------------------------------------------
AttributeError                            Traceback (most recent call last)
AttributeError: 'MessageFactory' object has no attribute 'GetPrototype'
---------------------------------------------------------------------------
AttributeError                            Traceback (most recent call last)
AttributeError: 'MessageFactory' object has no attribute 'GetPrototype'
---------------------------------------------------------------------------
AttributeError                            Traceback (most recent call last)
AttributeError: 'MessageFactory' object has no attribute 'GetPrototype'
---------------------------------------------------------------------------
AttributeError                            Traceback (most recent call last)
AttributeError: 'MessageFactory' object has no attribute 'GetPrototype'
3. 使用 Flax NNX 定义模型#
通过子类化 nnx.Module,使用 Flax NNX 创建一个用于分类的 CNN
from flax import nnx  # The Flax NNX API.
from functools import partial

class CNN(nnx.Module):
  """A simple CNN model."""

  def __init__(self, *, rngs: nnx.Rngs):
    self.conv1 = nnx.Conv(1, 32, kernel_size=(3, 3), rngs=rngs)
    self.conv2 = nnx.Conv(32, 64, kernel_size=(3, 3), rngs=rngs)
    self.avg_pool = partial(nnx.avg_pool, window_shape=(2, 2), strides=(2, 2))
    self.linear1 = nnx.Linear(3136, 256, rngs=rngs)
    self.linear2 = nnx.Linear(256, 10, rngs=rngs)

  def __call__(self, x):
    x = self.avg_pool(nnx.relu(self.conv1(x)))
    x = self.avg_pool(nnx.relu(self.conv2(x)))
    x = x.reshape(x.shape[0], -1)  # flatten
    x = nnx.relu(self.linear1(x))
    x = self.linear2(x)
    return x

# Instantiate the model.
model = CNN(rngs=nnx.Rngs(0))
# Visualize it.
nnx.display(model)
/Users/cgarciae/repos/flax/.venv/lib/python3.11/site-packages/treescope/renderers.py:251: UserWarning: Ignoring error inside wrapper hook <function use_autovisualizer_if_present at 0x3213b0360>:
Traceback (most recent call last):
  File "/Users/cgarciae/repos/flax/.venv/lib/python3.11/site-packages/treescope/renderers.py", line 225, in _render_subtree
    postprocessed_result = hook(
                           ^^^^^
  File "/Users/cgarciae/repos/flax/.venv/lib/python3.11/site-packages/treescope/_internal/handlers/autovisualizer_hook.py", line 47, in use_autovisualizer_if_present
    result = autoviz(node, path)
             ^^^^^^^^^^^^^^^^^^^
  File "/Users/cgarciae/repos/flax/.venv/lib/python3.11/site-packages/treescope/_internal/api/array_autovisualizer.py", line 306, in __call__
    jax.sharding.PositionalSharding
  File "/Users/cgarciae/repos/flax/.venv/lib/python3.11/site-packages/jax/_src/deprecations.py", line 54, in getattr
    raise AttributeError(message)
AttributeError: jax.sharding.PositionalSharding was deprecated in JAX v0.6.0 and removed in JAX v0.7.0

  warnings.warn(
运行模型#
让我们来测试一下 CNN 模型!在这里,您将使用任意数据执行一次前向传播,并打印结果。
import jax.numpy as jnp  # JAX NumPy

y = model(jnp.ones((1, 28, 28, 1)))
y
Array([[ 0.1840562 ,  0.5048592 ,  0.20095956,  0.48739675, -0.37915203,
        -0.5551914 , -0.5448129 , -0.04560127,  0.05879357,  0.13339688]],      dtype=float32)
4. 创建优化器并定义一些指标#
在 Flax NNX 中,您需要创建一个 nnx.Optimizer 对象来管理模型的参数并在训练期间应用梯度。nnx.Optimizer 接收模型的引用,以便更新其参数,并接收一个 Optax 优化器来定义更新规则。此外,您还将定义一个 nnx.MultiMetric 对象来跟踪准确率和平均损失。
import optax

learning_rate = 0.005
momentum = 0.9

optimizer = nnx.Optimizer(
  model, optax.adamw(learning_rate, momentum), wrt=nnx.Param
)
metrics = nnx.MultiMetric(
  accuracy=nnx.metrics.Accuracy(),
  loss=nnx.metrics.Average('loss'),
)

nnx.display(optimizer)
5. 定义训练步骤函数#
在本节中,您将使用交叉熵损失 (optax.softmax_cross_entropy_with_integer_labels()) 定义一个损失函数,CNN 模型将对其进行优化。
除了损失之外,在训练和测试期间,您还将获得logits,它们将用于计算准确率指标。
在训练期间——即 train_step——您将使用 nnx.value_and_grad 来计算梯度,并使用您已经定义的优化器来更新模型的参数。在训练和测试(即 eval_step)期间,损失和logits 将被用来计算指标。
def loss_fn(model: CNN, batch):
  logits = model(batch['image'])
  loss = optax.softmax_cross_entropy_with_integer_labels(
    logits=logits, labels=batch['label']
  ).mean()
  return loss, logits

@nnx.jit
def train_step(model: CNN, optimizer: nnx.Optimizer, metrics: nnx.MultiMetric, batch):
  """Train for a single step."""
  grad_fn = nnx.value_and_grad(loss_fn, has_aux=True)
  (loss, logits), grads = grad_fn(model, batch)
  metrics.update(loss=loss, logits=logits, labels=batch['label'])  # In-place updates.
  optimizer.update(model, grads)  # In-place updates.

@nnx.jit
def eval_step(model: CNN, metrics: nnx.MultiMetric, batch):
  loss, logits = loss_fn(model, batch)
  metrics.update(loss=loss, logits=logits, labels=batch['label'])  # In-place updates.
在上面的代码中,nnx.jit 转换装饰器会跟踪 train_step 函数,以便使用 XLA 进行即时编译,从而优化在硬件加速器(如 Google TPU 和 GPU)上的性能。nnx.jit 是 jax.jit 转换的“提升”版本,允许其函数输入和输出是 Flax NNX 对象。同样,nnx.value_and_grad 是 jax.value_and_grad 的提升版本。请查阅提升转换指南以了解更多信息。
注意: 代码展示了如何对模型、优化器和指标执行多次原地更新,但并未显式返回*状态更新*。这是因为 Flax NNX 转换尊重 Flax NNX 对象的*引用语义*,并将传播作为输入参数传递的对象的状态更新。这是 Flax NNX 的一个关键特性,它使得代码更加简洁易读。您可以在为什么选择 Flax NNX中了解更多信息。
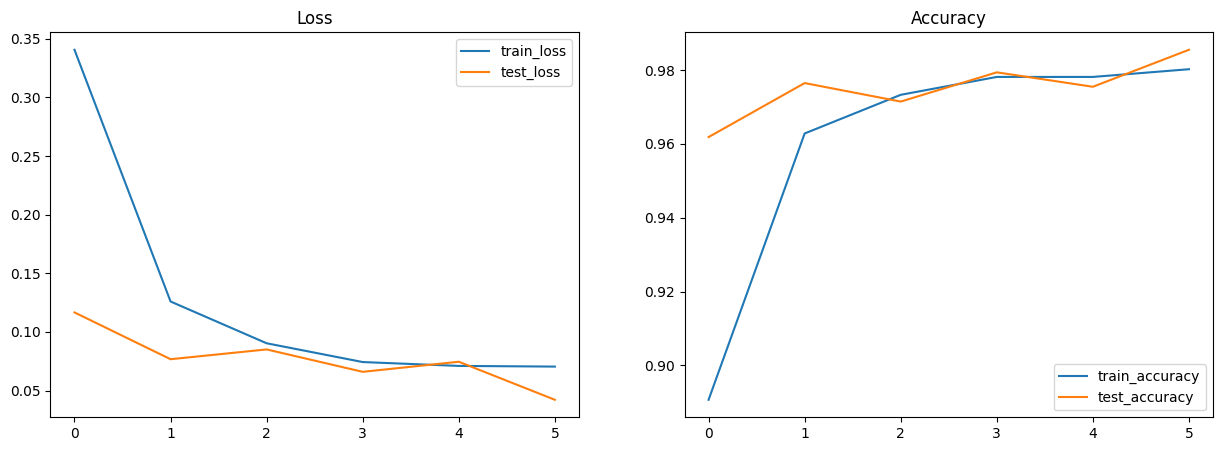
6. 训练和评估模型#
现在,您可以使用数据批次对 CNN 模型进行 10 个周期的训练,在每个周期后评估模型在测试集上的性能,并记录训练和测试指标(损失和准确率)。通常,这会使模型达到约 99% 的准确率。
from IPython.display import clear_output
import matplotlib.pyplot as plt

metrics_history = {
  'train_loss': [],
  'train_accuracy': [],
  'test_loss': [],
  'test_accuracy': [],
}

for step, batch in enumerate(train_ds.as_numpy_iterator()):
  # Run the optimization for one step and make a stateful update to the following:
  # - The train state's model parameters
  # - The optimizer state
  # - The training loss and accuracy batch metrics
  train_step(model, optimizer, metrics, batch)

  if step > 0 and (step % eval_every == 0 or step == train_steps - 1):  # One training epoch has passed.
    # Log the training metrics.
    for metric, value in metrics.compute().items():  # Compute the metrics.
      metrics_history[f'train_{metric}'].append(value)  # Record the metrics.
    metrics.reset()  # Reset the metrics for the test set.

    # Compute the metrics on the test set after each training epoch.
    for test_batch in test_ds.as_numpy_iterator():
      eval_step(model, metrics, test_batch)

    # Log the test metrics.
    for metric, value in metrics.compute().items():
      metrics_history[f'test_{metric}'].append(value)
    metrics.reset()  # Reset the metrics for the next training epoch.

    clear_output(wait=True)
    # Plot loss and accuracy in subplots
    fig, (ax1, ax2) = plt.subplots(1, 2, figsize=(15, 5))
    ax1.set_title('Loss')
    ax2.set_title('Accuracy')
    for dataset in ('train', 'test'):
      ax1.plot(metrics_history[f'{dataset}_loss'], label=f'{dataset}_loss')
      ax2.plot(metrics_history[f'{dataset}_accuracy'], label=f'{dataset}_accuracy')
    ax1.legend()
    ax2.legend()
    plt.show()
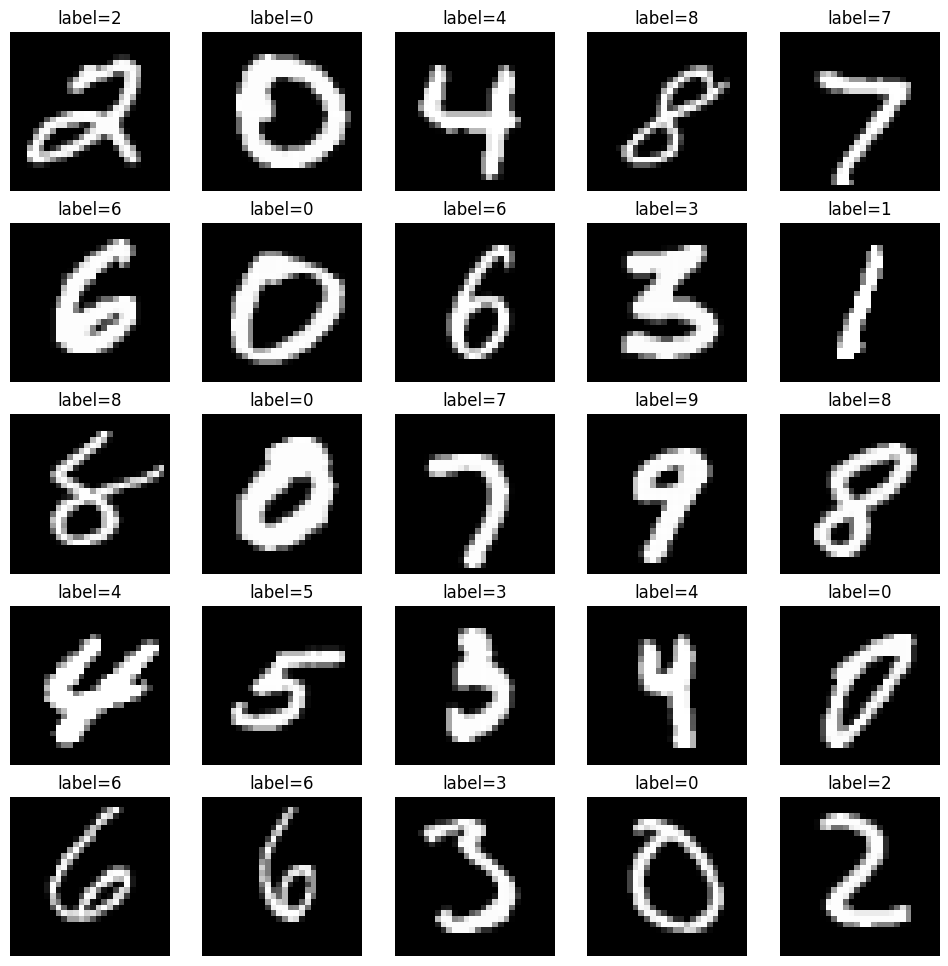
7. 在测试集上执行推理#
创建一个经过 jit 编译的模型推理函数(使用 nnx.jit)——pred_step——以使用学习到的模型参数在测试集上生成预测。这将使您能够将测试图像及其预测标签一起可视化,以便对模型性能进行定性评估。
model.eval() # Switch to evaluation mode.

@nnx.jit
def pred_step(model: CNN, batch):
  logits = model(batch['image'])
  return logits.argmax(axis=1)
请注意,我们使用 .eval() 来确保模型处于评估模式。尽管我们在此模型中没有使用 Dropout 或 BatchNorm,但 .eval() 可确保输出是确定性的。
test_batch = test_ds.as_numpy_iterator().next()
pred = pred_step(model, test_batch)

fig, axs = plt.subplots(5, 5, figsize=(12, 12))
for i, ax in enumerate(axs.flatten()):
  ax.imshow(test_batch['image'][i, ..., 0], cmap='gray')
  ax.set_title(f'label={pred[i]}')
  ax.axis('off')
恭喜!您已经学会了如何使用 Flax NNX 在 MNIST 数据集上端到端地构建和训练一个简单的分类模型。
接下来,请查阅为什么选择 Flax NNX?并开始学习一系列Flax NNX 指南。